When you have a serious plumbing issue, such as major leaks or pipe corrosion, you may be deciding between traditional repiping or epoxy pipe lining. This article will cover some of the key points to help you decide which option is best for your home or business.
Conventional repiping requires extensive digging and excavation, which can disrupt your daily routine. Epoxy Pipe Lining is a non-invasive solution to your plumbing problems that offers several benefits.
The cost of epoxy pipe lining can be less expensive than traditional pipe replacement methods. This is because the process is much less invasive and does not require any excavation. Additionally, the epoxy liners can be installed without any damage to existing pipes or buildings. However, the exact cost of epoxy pipe lining will depend on the scope and complexity of the project.
In addition to lowering upfront costs, the trenchless nature of epoxy pipe lining can also save you money on restoration expenses. For example, if you need to repair a section of landscaping or grass after a traditional pipe replacement, this can add up to $16,000 for just one thousand linear feet. In contrast, epoxy pipe lining can cost between $10,000 and $25,000 for the same length of pipe.
Before the epoxy lining process can begin, an evaluation will be conducted to determine the extent of the damage in your pipes. This can be done by using video sewer inspections or other tests. Once the assessment has been completed, the pipes will be cleaned and prepared. The epoxy resin will then be inserted into the pipes and allowed to cure.
The epoxy liner will prevent water from reaching your original pipe, so the metal won’t continue to corrode. It will also stop tree roots from infiltrating your pipes. Because of this, you’ll likely find that your plumbing will last longer and you’ll need fewer repairs over time.
If you’re looking for a more budget-friendly option, consider hiring a professional plumber to perform your epoxy pipe lining. A professional will have the equipment, expertise and experience to complete the job efficiently and correctly. They will be able to identify any problems with your drain system, clean the pipes thoroughly and ensure that the epoxy will cure properly.
In addition, a professional will be able to save you money in the long run by reducing future damage. A plumber can recommend the most suitable lining solution for your pipes, based on their condition and location. In addition, they will be able to offer you an accurate quote for the work that needs to be done.
Easy to install
Many older buildings have outdated piping systems that are at risk of corrosion. This can result in water leaks, which cause damage and increase your water bill. It can also cause health issues from contaminated water, which is why it is important to inspect and maintain your pipe system regularly. This way, you can prevent future problems.
Epoxy pipe lining is a great solution for old pipes because it doesn’t require the removal of your existing pipe. The process involves inserting a liner into your pipe and then applying an epoxy coating to the inside of the liner. The result is a new pipe inside your existing one that is more durable and has better flow capacity than your original pipe. In addition, the epoxy is resistant to calcification and corrosion.
The lining process is quick and easy, and it can be done without disrupting your home or business. It’s also less expensive than traditional repiping methods. It’s also less invasive and doesn’t require the removal of wallboard or flooring, which can be costly.
Unlike traditional plumbing repair, epoxy pipe lining is a non-invasive technology that allows for the inspection and maintenance of your pipes through small access points. The lining process is known as cured-in-place piping (CIPP), and it is more durable than traditional pipe replacement techniques.
This pipe repair technique requires no excavation, which makes it safer for your property and family. It’s also more environmentally friendly than the standard pipe replacement method, which can destroy plants and disrupt your home or office.
Another advantage of the CIPP procedure is that it can be used on old pipes in any condition. It’s even possible to use it on pipes with a diameter of up to 8 inches.
Before the lining process begins, your plumber will perform an inspection to determine whether your pipes are suitable for epoxy lining. If they are not, the plumber will recommend an alternative solution. Once the inspection is complete, your plumber will prepare the drains for the lining by using a high-pressure water jet sprayer. This process will remove any fat, oil, mud, dirt and debris from the inside of the drains. This is important to ensure that the epoxy lining will adhere properly to your pipes and last for a long time.
No damage to the surrounding area
Older buildings typically come with cast iron pipe infrastructure that is prone to corrosion. Corrosion causes water leaks, which can lead to costly water damage and a rise in your water bill. It can also increase the risk of sewer leaks that are dangerous to human health. In addition, the leaking water can cause structural damage to your building. The best way to prevent these problems is by getting your pipes repaired and lined.
Pipe lining is a non-invasive solution, which means that contractors won’t need to dig pits or holes in your home or garden. Instead, they’ll use existing cleanouts or make a new one for their equipment. This saves time and money, as well as preventing damage to your yard.
This method is also eco-friendly, since it doesn’t create waste for landfills or require extra recycling. In addition, it doesn’t produce carbon emissions during its manufacturing process. Unlike traditional piping methods, which use chemical cleaning agents that can cause environmental harm, epoxy is safe for the environment.
Epoxy lining, also known as cured-in-place (CIPP) lining, involves applying a special epoxy resin to the inside of your pipes to seal leaks and stop corrosion. This technique is ideal for older pipes that have become corroded and is an alternative to replacing your entire pipe system. It is also suitable for any type of pipe, including ductile iron and concrete pipes.
In the CIPP process, a contractor will inspect your pipes with video cameras to determine the extent of the damage. Once they have identified the area that needs to be lined, they’ll start the preparation process by cleaning the pipes. After that, they’ll check the pipes again to determine the length of liner needed. Then, they’ll install the liner and allow it to cure.
The lining process is quick and easy, taking only two days to complete. This is less than the weeks required by traditional piping techniques. It is important to hire a certified plumber, however, as the wrong epoxy resin could damage your pipes. Also, if the lining isn’t installed properly, it may fail and result in future problems with your plumbing.
No need to remove wallboard or flooring
One of the most significant benefits of epoxy pipe lining is that it does not require the removal of wallboard or flooring. This is a major advantage for property owners as it reduces the amount of time that is needed to restore a home or office. In addition, the process is less invasive and can be used in buildings that have historical value. Conventional sewer repair methods often require the removal of walls and floors, which can be difficult for homeowners to deal with.
A camera inspection is first performed to check the extent of the damage and determine which pipes need lining. This allows the installer to avoid areas of damage and ensures that they are getting the right length of lining for each pipe. The pipes are then cleaned thoroughly. This is done by blowing air with silica particles through the pipes. This is a similar process to sandblasting and removes oxidation that has formed in the pipes.
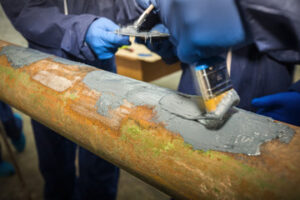
Once the pipes have been prepared, the epoxy lining is placed. This happens by running lines that have been soaked in resin through the damaged pipelines. The two-part epoxy resin cures in place to build a structural bond between the new lining and the existing pipe without disturbing the ground’s surface like with traditional repiping.
The resulting lining is a thick, durable and corrosion-resistant material that is designed to last up to 50 years. It is an ideal long-term solution for clogged and damaged pipes. It is also resistant to water and high pressure, making it an excellent choice for residential and commercial properties.
The cured-in-place piping method can be finished in just three days, including a day for cleaning and lining, and a day to reinstate the pipes (if applicable). It is much faster than conventional pipe replacement and can be completed with minimal disruption to the property. This method can also be used to repair leaks in corroded pipes in homes and businesses. A licensed plumber can provide more information about the advantages of this procedure and how it works.
