Cleaning Services

Why You Should Hire an Insulation Remover

Insulation removal can offer a variety of benefits for homeowners and businesses. However, it is a job that should be done by a professional with the correct equipment. For more information, click the link https://www.perthinsulationremover.com.au/ provided to proceed.

Whether your insulation is batt, board or blown in, it can be removed with proper preparation and equipment. This includes setting up your commercial vacuum, staging your materials and protecting the surface beneath.

Insulation is a vital component of your home, keeping the temperatures in your house stable and helping you save on energy bills. However, just like any other home building materials, insulation can get damaged or develop mold and mildew. If you notice that your insulation is swollen, water spotted, or showing signs of mold growth, it’s time to remove and replace it.

While fiberglass batting is very porous, mold has an uncanny ability to find its way into even the smallest gaps and crevices in your home’s walls. This is especially true in crawl spaces, where wet and cold conditions make it irresistible for mold to set up shop.

Mold in your insulation can cause health issues like coughing, sneezing, headaches, and persistent odors. It can also undermine the insulating power of your home, leading to higher heating and cooling bills. Mold spores also circulate through the air, contributing to indoor allergies and respiratory issues.

Whether it’s caused by water damage or simply a leaky roof, mold and mildew in your attic insulation can affect the rest of your home as well. It’s critical to act as soon as you notice any dampness in your attic insulation.

Mold and mildew in your insulation can also reduce its insulating value. This is because the cellulose material used to create the insulation relies on pockets of air to prevent heat conduction. When the insulation gets wet, these air pockets are compressed, lowering its insulating value.

The best way to know if your attic insulation is contaminated with mold is to perform a mold test. A professional can perform this service in your home, allowing you to take action before the problem worsens.

Pest Infestation

Pests like rodents, roaches, and flies can damage your insulation as they seek shelter or food in uninsulated areas. They also spread disease and make your living environment unpleasant or unsafe. While it’s normal to spot a few insects in your home now and then, recurring infestations require prompt action from experts.

Identifying signs of pests can help you prioritize your insulation removal needs. Droppings and urine are obvious indicators of pest activity, and the size, shape, and color of droppings can help you pinpoint the pest responsible. Gnaw marks and chewed materials, particularly around electrical wires or drywall, may also point to a problem with rodents. Rustling in the walls can be an indicator of ants, while dark clusters indicate fly infestations.

If you discover the remains of dead pests, it’s important to act quickly to prevent health hazards and structural damage. Rodents, cockroaches, and other pests breed rapidly in indoor spaces and can lead to serious issues that affect the health of people inside your building.

Some of the most common pests can be found in or near insulation, and they often find their way indoors through cracks, crevices, and gaps in the foundation, window and door frames, and plumbing. In addition, some pests seek shelter from the elements in attics and wall voids.

You can prevent pest infestations by sealing these entry points in and around your building. This includes preventing moisture from entering through window and door frames, caulking gaps, and using insect screens. You can also protect your insulation from pests by removing rotting wood, repairing damaged siding, and keeping shrubbery away from your house.

You can also take steps to prevent recurrent pests, such as termites and carpenter ants, by hiring professionals to treat your home or business on a regular basis. These measures, along with regularly scheduled inspections and a pest control program, can ensure your building’s safety and help keep your energy costs down. A professional service can also recommend long-term solutions that will prevent future pest invasions. Infestations can be costly, both in terms of property damage and your family’s or employees’ health.

Health Issues

Old insulation can be a home for allergens like dust mites and mold spores. These are not only a health risk, but they also harm your indoor air quality. Removing old insulation can improve your indoor air quality and make your home a healthier place to live.

Before starting any type of DIY insulation removal, it is important to ensure that the power in your attic is turned off and all electrical wires are disconnected. This will prevent the accidental cutting or short circuiting of live wires and ensure that nobody is injured during the process. It is also a good idea to shut off any fans or heaters in your attic that might be affected by the removal of insulation.

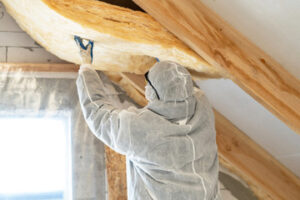
Blown-in cellulose and fiberglass insulation can be quite messy, so it is essential to wear the proper safety equipment when working with it. You will need to have a high-powered shop vacuum that is specially designed to remove this kind of loose material, as well as masks and protective clothing to keep you from breathing in any fibers or allergens.

It is also a good idea to cover all furniture and other items in the room where you plan on working with the insulation. This will prevent it from falling off and getting into other areas of the house where it could create problems. Finally, you will want to seal off any doors or windows in the room that are located directly over the area where you will be removing the insulation. This will keep the fibers from escaping into the living space and will help you to clean up the job faster and more thoroughly.

Once you have all of the necessary equipment, it is time to start removing the insulation. Begin by covering the floor and walls in your attic with plastic sheets to protect them from any mess that may occur during the process. Then, set up the attic insulation removal vacuum and begin sucking out the material. Continue until you have a large pile of soiled insulation material ready for disposal.

Structural Issues

The structural integrity of a home is essential to its comfort, value and safety. Structural issues are typically deal-breakers when it comes time to sell your home, and they can be very costly if left unaddressed. If you notice cracks or unlevel floors, it could mean your house is experiencing structural problems. One of the most common causes of structural problems is inadequate insulation, but there are other culprits too.

If you suspect that your house is suffering from a structural issue, the first thing to do is have it inspected by a professional. If the problem is caused by structural issues, such as an unstable foundation or a weakening of the walls or floor joists, then you’ll likely need to invest in extensive and costly repairs. However, if the problem is due to a poorly insulated attic or basement, insulating these areas should help stabilize your home.

Adding new insulation to your attic and ceiling can dramatically reduce your energy bills and make your home more comfortable. But before you take on the project yourself, it’s important to check your existing insulation to see if it is in good condition and does not need to be replaced. If it does need replacing, you’ll also want to consider the cost of materials and disposal of the old insulation as well as whether it is safe to use fiberglass or cellulose.

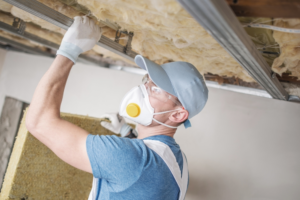
When you’re ready to tackle the job, be sure to wear protective gear such as gloves, safety goggles, a dust mask and long sleeves, which will protect your health from airborne insulation fibers and other potentially harmful allergens and irritants. Also, it’s important to have a good ladder or scaffolding when accessing the attic and a large heavy-duty vacuum for removing the insulation. When disposing of the old insulation, be sure to find a certified recycling or waste management facility that accepts insulation.

Another option for boosting your home’s insulation without tearing down walls is injection foam insulation. This is a relatively easy process that injects a foam into your wall cavities, compressing the old fiberglass and filling up the rest of the space. This method is quick and efficient, less disruptive to your home than a full remodel and less expensive than ripping down walls.

Home Improvement

Insulation Removal Can Lower Energy Use and Improve Comfort

Perth Insulation Removal can feel like a daunting task for homeowners. But it can also help lower energy bills and make your home more comfortable year-round.

Insulation Removal

While batting insulation can be easily rolled up and carried away, blown in, or loose fill insulation is a more complex matter. Here’s what to consider to ensure a smooth, safe and effective project:

Insulation removal is the process of taking out existing insulation in your attic, crawlspace or walls and disposing of it. It’s typically done as part of an energy audit or to replace old, worn out insulation. Older insulation types like balsamic wool and cellulose (made from recycled newspaper) may contain asbestos which needs to be removed by trained professionals in full safety equipment.

One of the first things that a professional insulation removal crew will do is to inspect your attic or crawlspace. They will take stock of the entire space to see how much room they have to work with and where any low spots or obstacles are. They will also make sure that they have enough equipment to complete the project in a safe and effective manner.

Once the inspection is complete, they will begin to roll up or blot out any contaminated insulation. This is especially important for blown-in fiberglass insulation since they’ll have to feed the large vacuum hose up into your attic space to get it all out. The contractor will carefully suck the old insulation into sealed bags for disposal, making sure not to get any contaminates into the rest of your home or attic space.

The other main reason that insulation is replaced is to address damage. Frequently, moisture is a problem. Whether it’s from a roof leak or faulty plumbing, insulation that is saturated with water will lose its R-value and create a perfect environment for mold to grow. Water damaged insulation will also be a breeding ground for vermin. In many cases the best solution is to remove and replace the affected insulation as quickly as possible.

A common sign that it’s time for insulation replacement is an increase in your energy bills. Ineffective insulation can allow air to pass through insulated spaces, cooling or heating your house unevenly. It’s also worth considering replacing your current insulation if it has lost its R-value due to age, water damage or other factors. This will help your home to be more comfortable, reduce your energy costs and protect the health of your family and pets.

Safety

Insulation removal can be dangerous for homeowners who attempt it without the proper equipment. This is especially true for older fiberglass insulation containing asbestos and other hazardous materials that can cause health issues including lung cancer and mesothelioma.

Safety gear for an insulation removal project includes a hard hat, gloves, safety goggles and dust mask. The safety mask helps protect your face from fiberglass particles that can irritate the skin and eyes, while the hard hat helps protect your head from falling debris during the project. Wearing comfortable work clothes that you don’t mind getting dirty is also a good idea. It will help you stay focused on the task at hand rather than worrying about how you’ll look afterward!

It is also important to turn off any electricity in the attic before starting your insulation removal project. This will eliminate any risk of electrical shock and minimize the risk of fire hazards caused by mishandling or cutting live wires during the process.

While it is tempting to skip this step and get started right away, turning off the power or disconnecting the electricity will provide a much safer working environment for everyone involved in the insulation removal process. It will also help prevent any unnecessary damage to your home’s electrical systems that could result in a costly repair bill down the road.

Once the power is turned off, you will need to carefully inspect the area before beginning your insulation removal. Often times, the attic floor will contain weak spots that could collapse under you if you accidentally step on them. If you find any areas that are damaged or contaminated by mold, rodent droppings, or other debris it is best to leave the cleanup to the professionals.

Finally, you’ll want to make sure that your attic is fully ventilated during the insulation removal process. Ventilation will help keep your breathing easier while you’re working, and it can also minimize the amount of dust that ends up in your home. You should try to take a break and get fresh air every 15 minutes or so while you’re working in the attic, so that your body temperature doesn’t rise too high and become uncomfortable.

Equipment

If you have old or damaged insulation, removing it can save money, improve the comfort of your home, and help to reduce energy use. It may be a complicated process though. You will need to inspect the attic space and prepare it for the removal. It is also possible that you will have to dispose of contamination such as rodent feces, urine, nesting materials and bird and bat droppings. This can be difficult to do by hand and is time consuming.

Insulation removal machines can eliminate a lot of the mess and make the job go faster. These machines work by using a vacuum process to suck the insulation into the bag for disposal. They are typically gas powered and come with a long hose to reach the attic and large bags to collect the material. They can be rented or purchased. If you plan to do more than one job it is often cost effective to purchase.

You should also consider using a face mask, a respirator, or a dust mask to protect yourself from breathing in any fiberglass particles. They can sting your eyes and irritate the skin. They can also cause respiratory problems and lung damage. It is also important to wear gloves and protective clothing when working with any type of insulation material.

Other equipment you might need includes a small rake to break up any clumps of insulation. A ladder is also a good idea to access the attic space for the project.

Once you have the right equipment for the job, follow the steps outlined in this article to remove insulation and improve your home’s energy efficiency. Take a moment to cover the floor and walls before you start the process, and be sure to wear all your personal protective gear. You will also need to check with your city or county waste management organization to find out how to dispose of the old insulation. If you have any questions or concerns, contact a professional attic insulation contractor like Energia to discuss your project. They can provide you with more detailed information about the cost and process of insulation removal.

Disposal

A successful insulation removal project requires proper planning, preparation and safety precautions. Depending on the scope of the project, hiring professional assistance may be wise to ensure efficiency and safety.

The first step is to assess the condition of the insulation and determine the best method for removal. The type of insulation will also influence the process. For example, blown-in insulation can be removed using either a wet or dry method. The dry method uses specialized vacuum equipment to remove the material and avoids airborne particles. The wet method sprays the insulation with water or a solution to dampen it before removal. This can reduce the risk of mold growth and minimize the release of contaminants.

Once the necessary equipment is ready, it’s time to begin the removal process. Ensure the workspace is clear and protect any furniture or belongings from the mess. Cover or shield vents, windows, and other openings to prevent the spread of contaminants. It is important to keep the work area well-ventilated to avoid breathing in insulation fibers. Wear appropriate gear, including masks, gloves, and goggles. It is recommended to wear a respirator during the entire project.

As you move through the process of removing the old insulation, collect it in garbage bags and dispose of it when full. This is an ideal way to eliminate the debris without spreading it throughout your home. The bags can be taken to a dumpster rental company for proper disposal.

It is also important to find out if the old insulation contains hazardous materials, such as asbestos. This will help you plan for any additional steps and safety measures to follow. This information can be obtained through consultation with a professional or by conducting a test yourself. It’s important to find out whether the material is contaminated before starting a project.

If you do find that the old insulation does contain hazardous materials, it will need to be disposed of differently from other waste. Contact your local waste management or recycling center to find out what options are available. In many cases, this material can be recycled to create new energy and reduce landfill waste.